
I recently bought a Samsung Galaxy J7 (SM-J700F) Indian variant from +Flipkart . You can read the complete phone specification from here . But as factory set settings, J7 has some flaws like WiFi saving mode is ON as default (resulting continuous disconnection of WiFi), Samsung has set the media volume as very low in the Stock firmware (OS by Samsung) as default. So the Ringtones and media played or the notifications in the phone will be having very low Volume, resulting missing your calls and other notifications. Samsung has disabled the Lollipop multi user interface on Samsung Galaxy J7.
All of the Guides I'm going to describe here is for is compatible for Samsung Galaxy J7 (SM-J700F) Android version 5.1.1 and its not mine but taken from XDA Forum and tested by me and working fine.
You can tune and tweak the performance of your phone doing some modification to it. To modify it, you need to Root and install custom recovery ( Recovery is like boot menu/options in a PC). Stock recovery (Factory/Samsung's recovery) won't be having enough capability to flash/install a Custom OS or an application through it. So we need to install a Custom recovery and Root (Install SuperSu ) the device to gain more control and modify it to make it work better.
Turn the WiFi saving mode off (No Root needed)
Increase Media Volume (Ringtones & Notifications)
Enable call recording on Stock Rom
Enable Multi users
Install Xposed Framework
Turn the WiFi saving mode off (No Root needed)
Go to phone keypad dial *#0011#
Automatically should go onto a screen

Go to more (tapping over the top)
 Go to WiFi
There should be a button there saying WiFi saving and it should be ON turn it OFF by tapping there.

And then reboot
Done.
How to Install TWRP (Custom recovery) and Root Samsung Galaxy J7 (SM-J700F)
Disclaimer
Your warranty is now void.
Flashing firmwares void your device warranty. You alone are responsible for any consequences that might occur during the process. I am not responsible for any bricked devices.
Preparations
Enable USB Debugging on your phone:
This is very important thing to be done before you try flashing a firmware or recovery file. USB Debugging mode make Android devices receptive to download and send data over USB cable connection. If you do not know how to turn debugging mode ON, do this:
Go to Settings> About Device.
Scroll down to find Build number and tap it 7 times.

You will see a message that “Developer mode has been enabled” on your device.

Now go back to Settings panel and you will find a new item called Developer options there.
Tap it and go to USB debugging option and check the box to enable it.

Enable OEM Unlock: Go to Settings> Developer Options> and turn on OEM unlock.
Install Samsung Android USB Driver for Windows to your Laptop/PC
Steps to root your phone:
1) Download Odin, TWRP Recovery & SuperSU file to your Laptop/PC.
2) Turn off your phone.
3) Go to download mode (by pressing Volume down+home+power buttons at the same time for about 6-8 secs)

4)Press the Volume up button to continue.
5)Open the ODIN file you downloaded on your Laptop/PC. (By Double-clicking the Odin v3.10.7.exe file. This will open an Odin window.)
6) Connect your phone to your laptop/PC through USB cable.
7) When ODIN detects your phone, It will show added in the Log.


9) Click on start. The flashing process will start.
10) If the flashing succeeds, ODIN will show 'PASS'. That means the recovery flashed successfully. It will boot into recovery.
11) Swipe to Allow Modifications. Click on Reboot then System.
12) Copy and place downloaded SuperSU file to your external SD card.
13) Turn off your phone.
14) Reboot to recovery (by pressing Volume up+home+power buttons).
15) The recovery will start. Select 'install zip'.
16) Click on Storage to change from Internal Storage to Micro SDcard.
17)Select SuperSU which you downloaded. Swipe to Confirm Flash. Flashing process will start. Once Completed. Wipe Cache/dalvik.
18) After it finishes, go back and reboot your phone.
Enjoy your rooted Samsung Galaxy J7 !!!
Downloads
Samsung Android USB Driver for Windows
Odin3_v3.10.7
Recovery - TWRP-3.0.0-0-j7elte-j7elte.img.tar
SuperSU
How to increase the Samsung media volume (Volume up mod) for Samsung Galaxy J7
1) Download this modified mixer_paths.xml file from here:
Modified Mixer paths.xml File
2) Go to Device using the file explorer/manager (Es file explorer, preferable)
3) Backup your original mixer_paths.xml file located in System/etc to your SD card.
4) Using root explorer copy the modified file and paste it in System/etc and agree to Rewrite/Replace.
5) Set permissions to rw-r-r to the mixer_paths.xml file. Click on mixer_paths.xml >> click options >> Change (permission) >> Read, Write, Read, Read, Press OK.
(See the below screen shot to see how to set the permission.)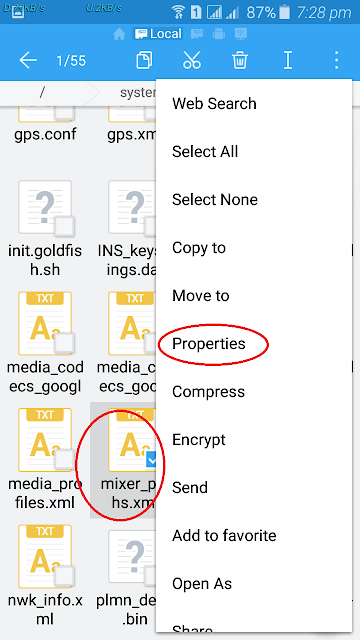
Samsung Android USB Driver for Windows
Odin3_v3.10.7
Recovery - TWRP-3.0.0-0-j7elte-j7elte.img.tar
SuperSU
How to increase the Samsung media volume (Volume up mod) for Samsung Galaxy J7
1) Download this modified mixer_paths.xml file from here:
Modified Mixer paths.xml File
2) Go to Device using the file explorer/manager (Es file explorer, preferable)
3) Backup your original mixer_paths.xml file located in System/etc to your SD card.
4) Using root explorer copy the modified file and paste it in System/etc and agree to Rewrite/Replace.
5) Set permissions to rw-r-r to the mixer_paths.xml file. Click on mixer_paths.xml >> click options >> Change (permission) >> Read, Write, Read, Read, Press OK.
(See the below screen shot to see how to set the permission.)


(You should set the correct permissions (rw-r-r ) or you will get into boot loop )
Enable Call recording in Samsung Galaxy J7


1.)Download the modified others.xml file from here
2.) open the file explorer (ES File explorer preferred) and Go to Device >> system >> CSC folder (backup the " others.xml " file, if you needed)
3.) Then just paste and overwrite it ! And set permissions to rw-r-r (Same like above post about Mixer paths file)
Enable Multi users on Samsung Galaxy J7
Multi Users on Android is same like users accounts on MS Windows ! Its a feature from Lollipop android version that the Google has been introduced. But Samsung has been disabled that feature in their Stock Roms. You can enable it by following the below tutorial. Multi user actually very helpful if we want to give our phone temporarily to a stranger or to a friend unattended that we don't want their eyes to pop in to our personal things. Multi users will automatically create a Guest account and Admin account (For the owner). So If we want to give our phone to someone we can turn on Guest account, so in Guest account none our Applications or Images in the Gallery, Contacts, Messages won't show up. So its safe to give our phone to a someone temporarily.
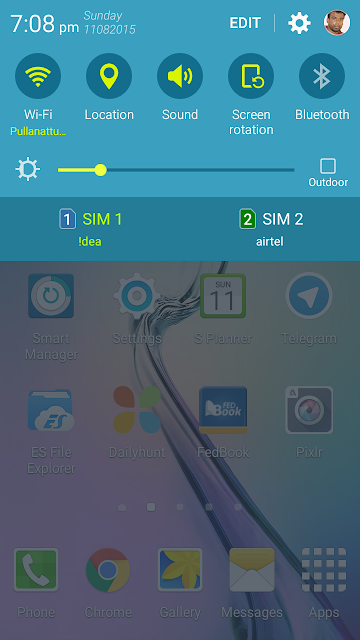
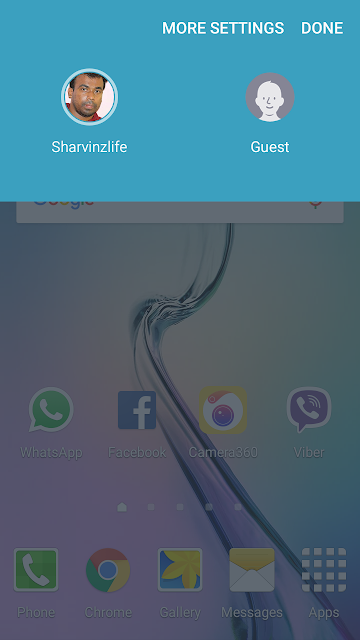
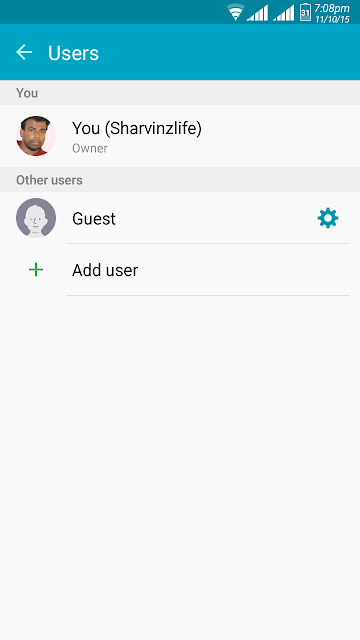

2.) open the file explorer (ES File explorer preferred) and Go to Device >> system >> CSC folder (backup the " others.xml " file, if you needed)
3.) Then just paste and overwrite it ! And set permissions to rw-r-r (Same like above post about Mixer paths file)
Enable Multi users on Samsung Galaxy J7
Multi Users on Android is same like users accounts on MS Windows ! Its a feature from Lollipop android version that the Google has been introduced. But Samsung has been disabled that feature in their Stock Roms. You can enable it by following the below tutorial. Multi user actually very helpful if we want to give our phone temporarily to a stranger or to a friend unattended that we don't want their eyes to pop in to our personal things. Multi users will automatically create a Guest account and Admin account (For the owner). So If we want to give our phone to someone we can turn on Guest account, so in Guest account none our Applications or Images in the Gallery, Contacts, Messages won't show up. So its safe to give our phone to a someone temporarily.


1.) Go to Device using the file explorer/manager (Es file explorer, preferable)
2.) Search for " build.prop "
2.) Search for " build.prop "

3.) Edit and add the below string at the end of the editor and save and reboot !
fw.max_users=3
fw.show_multiuserui=1
Now Enjoy Multi Users
Install Xposed Framework on J7
Most Android users mainly root their devices only to install Xposed Framework. Xposed Framework is a powerful tool that enables you to modify your ROM as you wish using some tweaks. Xposed Framework can be installed not only on Custom ROMS but also on the Stock ROMS. So using Xposed you can add some tweaks to your Stock ROM or firmware and get the features of a custom ROM.
Official build of Xposed framework for Lollipop Samsung Galaxy Devices has not been released yet, since Samsung made a lot of changes to ART (Android Runtime) without providing the sources. So we have the unofficial build now and we need to flash the Framework (SDK.zip) rather than just installing the Apk like in other versions of android so as Jelly Bean and Kitkat (Where the Xposed installer apk file would install the framework on your system automatically.)
3. Go to TWRP select Install and navigate to Xposed file "xposed-vxx-sdk22-tw-arm-custom-build-by-wanam-xxxxxxxx.zip" Make sure you select the storage as Micro SDcard in the above when you navigate to find the Xposed Framework file to flash (install through TWRP).

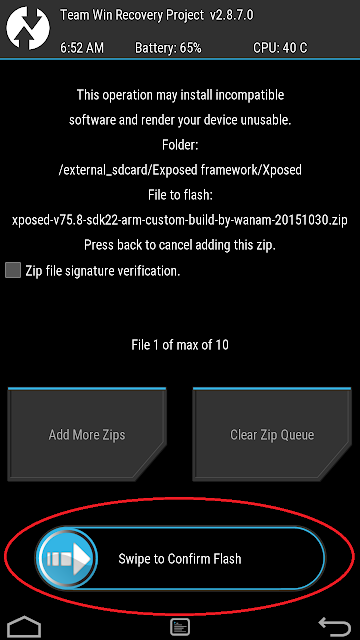
4. Reboot It takes a little time to boot up as it want to update our Android System.
Enjoy the Xposed framework on your Samsung Galaxy J7 !
Credits: wanam
How to use Xposed Installer
1. Go to Xposed installer app on your phone and select Download.
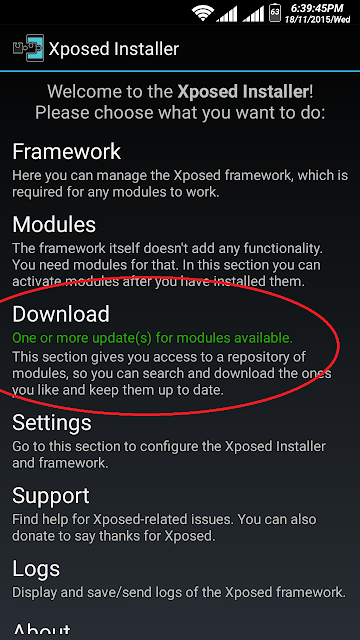
2. Download and install the different modules you want to tweak your phone. After downloading a modules please don't open the app untill you enable it on Xposed framework by going to Module section on xposed installer app and selecting it on the check box there. Then retstart your phone to use the module you have installed.
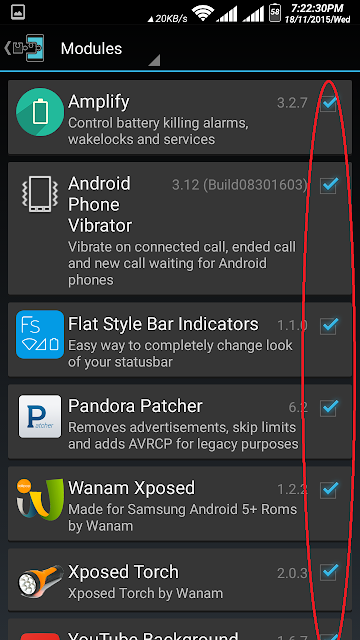
All the Exposed modules listed on the download section won't work for Samsung Lollipop Stock based Roms. Please refer the the screen shot above to see the Modules that i use on Xposed framework.
I hope my post is noob friendly, If you have any troubles or doubt in any section of my post. Please feel free to comment on. I can reply to sort your troubles out.
Now Enjoy Multi Users
Install Xposed Framework on J7
Most Android users mainly root their devices only to install Xposed Framework. Xposed Framework is a powerful tool that enables you to modify your ROM as you wish using some tweaks. Xposed Framework can be installed not only on Custom ROMS but also on the Stock ROMS. So using Xposed you can add some tweaks to your Stock ROM or firmware and get the features of a custom ROM.
Official build of Xposed framework for Lollipop Samsung Galaxy Devices has not been released yet, since Samsung made a lot of changes to ART (Android Runtime) without providing the sources. So we have the unofficial build now and we need to flash the Framework (SDK.zip) rather than just installing the Apk like in other versions of android so as Jelly Bean and Kitkat (Where the Xposed installer apk file would install the framework on your system automatically.)
Preparations
1. Make a nandroid backup using TWRP (in case if anything goes wrong) before installing Xposed Framework.
With the Nandroid backup (which is an excellent feature on custom recoveries like TWRP) you can backup all your current state of your operating system on your device and save it in your SD card or on your Computer storage and restore it at anytime you want. Many people will have perplexity that, If their Stock ROM (Firmware/OS) is rooted would it be able to do a backup of their OS and can able to restore it?. Yes you can do backup of the current state of your firmware with the custom recoveries like TWRP no matter your OS is rooted and made changes by using root.
How To Backup your current ROM
1. Reboot to recovery (by pressing Volume up+home+power buttons).
2. Select back Up in the recovery.
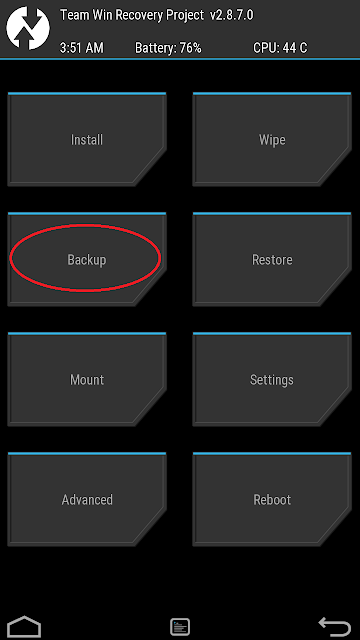
3. Check Boot,Data, and System. (If you want backup completely, you can check Radio & EFS too) You should at least once back up efs and modem, the first time you use the custom recovery you should make an original back up of System, Data, Boot, EFS, and Radio. EFS holds all your communication information most importantly the IMEI, Radio is a back up of the phones Modem.
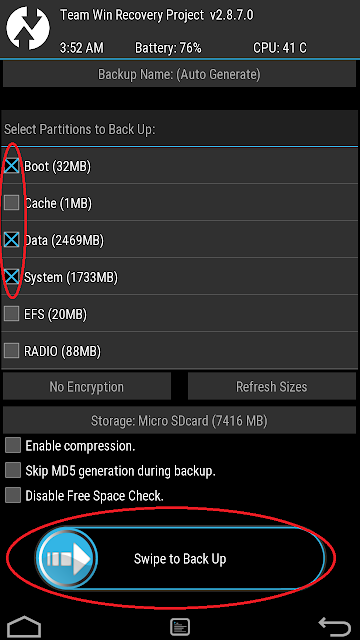
4. Click on storage and change the Internal Memory to Micro SDcard (refer below image.) And swipe it in the bottom to back up (refer above image).
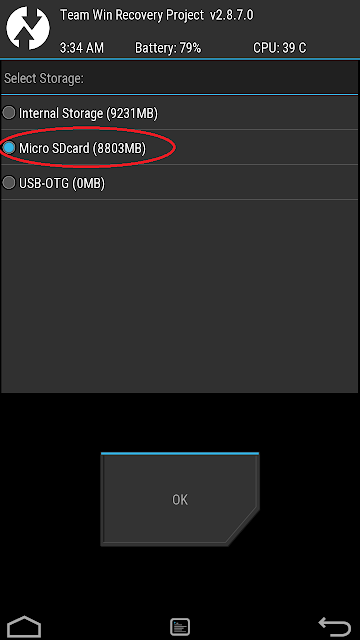
5. When backup gets completed, just press Reboot system, that simply reebots your phone up..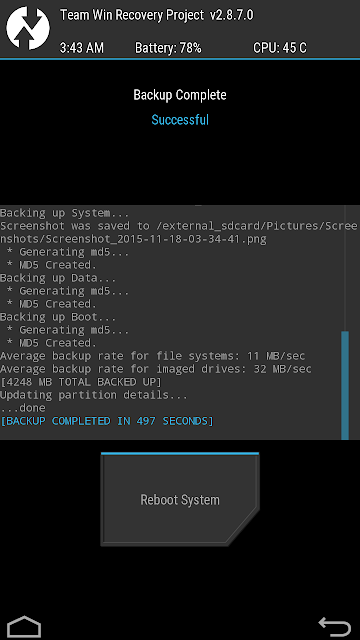
Congratulations now you have the backup of your Current Rom which can be restored anytime you want if ever had any issues playing with your Rom.
How To restore the Rom you have backed up
1. Go to TWRP recovery select Restore.
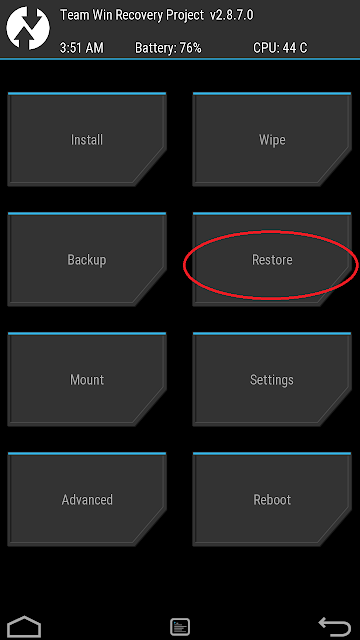
2. Then you could able to see the package of the Rom you have backed up.
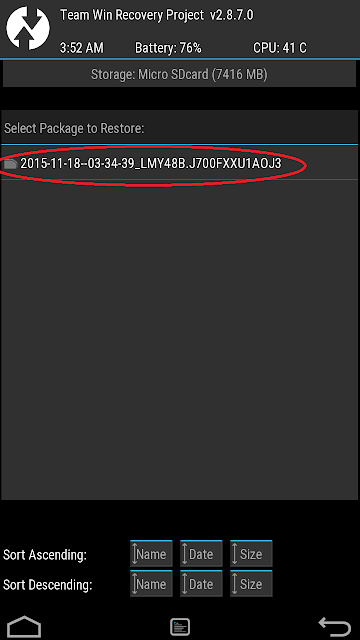
3. Select it and swipe to restore the Backup of your Rom you have made. Then reboot system, then you will able to use your phone as though the way it was when you backed up.
Steps to to install the Xposed Framework for Galaxy J7
1. Install Xposed Installer App
2. Download & copy the Xposed file and the Xposed Uninstaller to your sdcard
1. Make a nandroid backup using TWRP (in case if anything goes wrong) before installing Xposed Framework.
With the Nandroid backup (which is an excellent feature on custom recoveries like TWRP) you can backup all your current state of your operating system on your device and save it in your SD card or on your Computer storage and restore it at anytime you want. Many people will have perplexity that, If their Stock ROM (Firmware/OS) is rooted would it be able to do a backup of their OS and can able to restore it?. Yes you can do backup of the current state of your firmware with the custom recoveries like TWRP no matter your OS is rooted and made changes by using root.
How To Backup your current ROM
1. Reboot to recovery (by pressing Volume up+home+power buttons).
2. Select back Up in the recovery.

3. Check Boot,Data, and System. (If you want backup completely, you can check Radio & EFS too) You should at least once back up efs and modem, the first time you use the custom recovery you should make an original back up of System, Data, Boot, EFS, and Radio. EFS holds all your communication information most importantly the IMEI, Radio is a back up of the phones Modem.

4. Click on storage and change the Internal Memory to Micro SDcard (refer below image.) And swipe it in the bottom to back up (refer above image).

5. When backup gets completed, just press Reboot system, that simply reebots your phone up..

Congratulations now you have the backup of your Current Rom which can be restored anytime you want if ever had any issues playing with your Rom.
How To restore the Rom you have backed up
1. Go to TWRP recovery select Restore.

2. Then you could able to see the package of the Rom you have backed up.

3. Select it and swipe to restore the Backup of your Rom you have made. Then reboot system, then you will able to use your phone as though the way it was when you backed up.
Steps to to install the Xposed Framework for Galaxy J7
1. Install Xposed Installer App
2. Download & copy the Xposed file and the Xposed Uninstaller to your sdcard
3. Go to TWRP select Install and navigate to Xposed file "xposed-vxx-sdk22-tw-arm-custom-build-by-wanam-xxxxxxxx.zip" Make sure you select the storage as Micro SDcard in the above when you navigate to find the Xposed Framework file to flash (install through TWRP).


4. Reboot It takes a little time to boot up as it want to update our Android System.
Enjoy the Xposed framework on your Samsung Galaxy J7 !
Credits: wanam
How to use Xposed Installer
1. Go to Xposed installer app on your phone and select Download.

2. Download and install the different modules you want to tweak your phone. After downloading a modules please don't open the app untill you enable it on Xposed framework by going to Module section on xposed installer app and selecting it on the check box there. Then retstart your phone to use the module you have installed.

All the Exposed modules listed on the download section won't work for Samsung Lollipop Stock based Roms. Please refer the the screen shot above to see the Modules that i use on Xposed framework.
I hope my post is noob friendly, If you have any troubles or doubt in any section of my post. Please feel free to comment on. I can reply to sort your troubles out.




.jpg)


.jpg)